I present my credentials: Mikko was born at nearly 12 pounds, and he just grew from there! Two months in, he weighed 20 pounds, and at a year old his weight was in the 90th percentile...for 3 years olds. For his first few months out of the womb, all he wanted was to be carried. We were happy to oblige, but it meant a steep growth curve in our arm musculature. We weren't allowed to sit down or stop bouncing him -- have you ever bounced a 20-pound weight for several hours? I have, and I needed the support of a good carrier to make it possible.
I was very excited about the benefits of wearing your baby, and I stocked up on various ring slings and cloth wraps, even making my own, before Mikko was born. I read instructions for how to put them on, and I practiced (don't laugh!) with my old teddy bear. (You can laugh a little.)
And then came baby. Some of what I thought would be perfect wasn't, and some of what I hadn't considered was ideal. Every baby is different, and each parent-baby dyad has unique preferences, but here's what worked for our family, and what's still working at 19 months and 36+ pounds!
I've decided to break up my recommendations into several posts and highlight one carrier per post. The stretchy wrap gets its turn today, since that was the first carrier we enjoyed with our newborn! (Links to the later posts have been updated at the bottom.)

Best timeframe: Newborn to 4-6 months old (or up to ~20 pounds)
We started off with a long cloth wrap made out of a fabric with some give to it -- a stretchy, fuzzy brown velour.
Make your own
I followed the instructions at mamatoto.org titled encouragingly "Make a No-Sew Wrap." The instructions involve buying fabric and cutting with scissors. Ta-da! (Psst: mamatoto.org is a wonderful source of babywearing info.)
The instructions tell you what fabrics work and what don't. You basically need...um, fabric. About 5 or 6 yards of it. To make it stretchy, get fabric with stretch to it (could you have figured that out for yourself?), but you can also use non-stretchy woven fabric for a different kind of wrap. I found the slightly stretchy kind to be perfect for newborns, since you can pop them in and out more easily without untying your handiwork. You can also adjust things a little more easily as you're getting used to wearing your baby.
Scour the aisles of your local JoAnn's and see what fabric is on sale -- and what's attractive to wear! Because, just as a side note, be conscious that you will be wearing this, not your baby. Choose a fabric that will make you feel stylish; if an opposite-sex babywearer is in the picture, make sure it suits the other half as well! Perhaps leave the pastel bunnies print to the nursery (unless that makes you happy).
For my thrift sisters out there, you might have a suitable large swath of fabric lying around the house already. Even an old bedsheet (jersey knit would be ideal) can be made into a wrap.
Tie one on

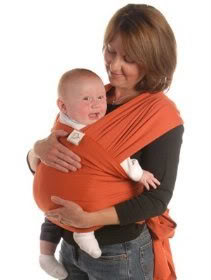
 The easiest and most popular wrap for a stretchy baby carrier like this is Front Wrap Cross. It puts your baby tummy to tummy with you and the wide cross of fabric over your back helps support the weight in front. For a little baby, pull fabric over the back of the newborn's head to support it. You can tuck a very small baby's legs in, or leave an older baby's wrapped around you outside the wrap. The upright position can be soothing for any infants who have trouble with reflux. You can also cuddle your baby down farther and sideways into the wrap -- experiment and see what seems comfortable for you both.
Here's a similar version of the front wrap cross for nursing: Super Easy Newborn Hands-Free Nursing. Caveat: I never did convince Mikko to nurse while his head was covered, so upright still worked best for us, but these instructions look like you could breastfeed out and about with no one the wiser.
Here are videos for the carries, offering demonstrations along with tips.
You can also use your big length of soft, stretchy fabric as a blanket, a nursing cover-up, a burp cloth, a shawl, a pillow. There are no rings or padding to get in your way. By the same token, it's simple to tuck into a diaper bag. Several yards of fabric is still bulky -- don't get me wrong, but no bulkier than a comfy baby blanket.
Buy online
If you don't want to make your own carrier, the images in this post link to two commercial versions called the Moby Wrap and the Sleepy Wrap
 . Here's Moby Wrap's set of helpful instructions for how to wear it.
For my thrift sisters out there, you might have a suitable large swath of fabric lying around the house already. Even an old bedsheet (jersey knit would be ideal) can be made into a wrap.
Tie one on

Here's a similar version of the front wrap cross for nursing: Super Easy Newborn Hands-Free Nursing. Caveat: I never did convince Mikko to nurse while his head was covered, so upright still worked best for us, but these instructions look like you could breastfeed out and about with no one the wiser.
Here are videos for the carries, offering demonstrations along with tips.
You can also use your big length of soft, stretchy fabric as a blanket, a nursing cover-up, a burp cloth, a shawl, a pillow. There are no rings or padding to get in your way. By the same token, it's simple to tuck into a diaper bag. Several yards of fabric is still bulky -- don't get me wrong, but no bulkier than a comfy baby blanket.
Buy online
If you don't want to make your own carrier, the images in this post link to two commercial versions called the Moby Wrap
Carry your baby every which way
Don't be scared by needing to learn how to tie it on -- it's easy. Just practice on a teddy bear...or go straight for experimenting with the baby!

 You can wear a wrap in a variety of ways: front facing in, front facing out, on your back, on your hip, upside down, on your head. Not really on those last two -- just seeing if you were still paying attention. You can even carry more than one baby at a time!

Here John Oliver* shows you how the front wrap cross is done:
*I think I'm joking, but I'm not sure.
With a heavy, growing baby, eventually you will feel the knit fabric stretching a little too much for your taste, or for the comfort of your back. That's when you know it's time to move on to a wrap or carrier with a little more structure. More reviews of such options to come!
Posts in this series, in order:


 I'm Lauren Wayne, writer and natural parent. I embrace attached parenting with an emphasis toward green living.


2 comments:
That is not John Oliver, alas, but I too had to do a double take!
Your links for the breastfeeding info. are not working. They all go to the same (generalized) place. Could you update them? I have a 2 month old who loves to nurse (and be held), who also spits up a lot. So nursing upright would be ideal. But everytime I have tried the wrap seems insecure - her bottom is by my hips (and I'm 6'0" tall).
Post a Comment