

I first saw these adorable handprint snowmen ornaments on Natural Parents Network, which linked to the full tutorial on Little Bit Funky, which linked to the original (maybe?) tutorial at Full of Great Ideas. It's a holiday chain o' awesomeness! These are my favorite ornaments on the tree each year, so I think it's time for a reprise!
Supplies:

- Plain ornaments: We had two kids at the time, so I bought a box of eight ornaments at Michael's in a neutral pale green and had two for us, two for one set of grandparents, two for the other, and two to get messed up.
- White acrylic craft paint: The first year, I tried to get clever and bought white glitter paint to look more like snow. It wasn't opaque enough to show up. Make sure you buy opaque white. If you like the glitter idea, you could always paint over the snowmen with clear glitter paint after the first layer dries.
- Sharpies: I highly recommend the Ultra Fine Point for ease in drawing teensy designs. If you don't have a set handy, craft and office-supply stores let you buy individual colors. Make sure you have orange for the carrot nose and black for the coal eyes and buttons. Other colors are fun for decorating the snowpeople's clothing.
- Foam craft brush: I found this the easiest way of spreading the paint evenly on a child's hand.
- Drying surface: Ideas include an empty dish drainer, an egg carton, or the box the ornaments came in. You could also use several sturdy cups.

We tried this one year, and there was too much sadness to continue. We tried again the next year, and they were both older and more tolerant.
Just be sure to prep them ahead of time about what to expect and to have ample cleanup materials ready and waiting! I'm waiting to see when Karsten might agree to this project so I can get his hand immortalized as well!
 |
| A year later, Alrik was intrigued rather than traumatized. |
Directions:
- Prepare your drying surface.
- Prepare your children. Tell them you'll be painting wet, cold paint onto one hand and that it will be goopy for a bit but that you'll wash it all off right after. Go over the instructions ahead of time with them and have everybody practice hand moves first without the paint.
- Brush the white craft paint onto your children's palm. Apply a thick but even layer using the foam brush to cover all fingers and the thumb. If you're making multiple ornaments, recoat the hand each time.

- Have your children hold their palm flat, and you lower the ornament down onto it. Hold it by the stem and center the bottom on their palm.
- Your children should gently but firmly close their fingers and thumb around the ornament. Practice ahead of time how to grab and release without smearing.

- After they fully release the ornament, pull it up and away. Blammo! If there were mistakes at this point, wash the paint off right away while it's still wet, dry the ornament, and try again.
- Wash up, and leave the ornaments to dry completely. Go make a gingerbread house or summat.

- Optional: Paint over the dry white snowmen with clear glitter paint for extra sparkle. Since I didn't do this, I couldn't say whether it should come before or after the Sharpie decorating, so I'm giving this my best guess. If you try it, let me know!
- When dry, decorate the "snowmen" with your Sharpies. Be creative, but if you don't want to be: Carrot noses are orange, coal eyes and buttons are black, and a little cute smile never goes amiss. I added brown stick arms and outfitted them with colorful toques, top hats and scarves.
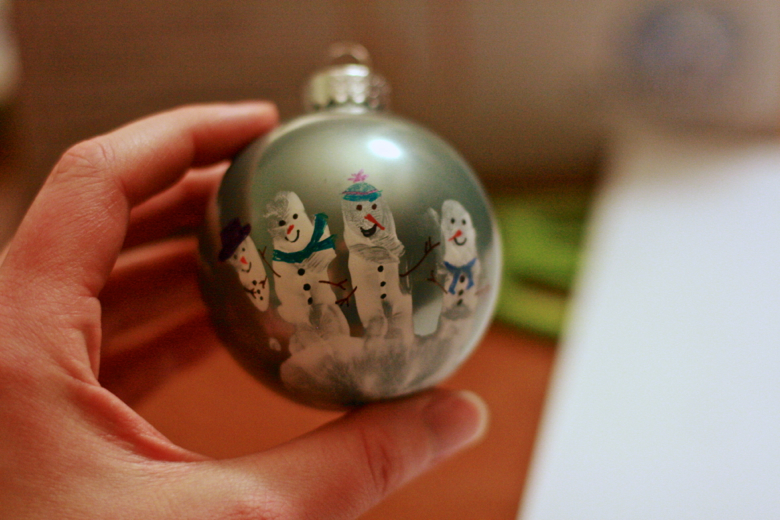

- In the palm area on the bottom, write the child's name and year. Then you'll always remember when their hands were that small.

- Carefully wrap 'em up and ship 'em out. The grandparents will be delighted! And so will you be each year when you unwrap your precious keepsakes to place on your Christmas tree.


 I'm Lauren Wayne, writer and natural parent. I embrace attached parenting with an emphasis toward green living.


0 comments:
Post a Comment